
Perennials are the backbone of many gardens. They return year after year, growing larger, stronger, and more vibrant with each season. But as they mature, many perennial plants begin to outgrow their spaces, compete with neighbors, or lose their vigor. That’s when dividing perennials becomes essential.
Division not only maintains a plant’s health but also gives you more plants to spread around your garden—or share with friends. The key is doing it correctly so you don’t damage the roots or stress the plant.
Whether you’re a new gardener or looking to refine your technique, this guide will walk you through how to divide perennials without damaging roots, along with the best timing, tools, and aftercare practices.
Why Divide Perennials?

Dividing perennials isn’t just about making more plants. It plays several important roles in garden maintenance:
1. Keeps Plants Healthy
Over time, perennials can become crowded, causing poor air circulation and reduced flowering. Division helps them breathe and grow properly.
2. Encourages Better Blooming
When roots have enough space and nutrients, perennials produce more abundant and vibrant blooms.
3. Prevents Root Competition
Dividing helps avoid overcrowding, which can lead to stunted growth or disease.
4. Saves Money
Instead of buying new plants each season, dividing existing ones helps you expand your garden for free.
5. Revitalizes Old Plants
Older perennials often develop dead centers or weak stems. Division stimulates fresh, young growth.
When Is the Best Time to Divide Perennials?

Timing is one of the most important parts of successful division. Different perennials have different growth patterns, so choosing the right season can protect the roots from shock.
Spring Division
Ideal for:
- Late-summer bloomers
- Fall bloomers
- Plants that started growing early and aren’t yet flowering
Spring is great for division because plants are actively growing and recover quickly.
Fall Division
Ideal for:
- Spring bloomers
- Early-summer bloomers
Dividing in fall gives roots time to establish before winter, without competing energy demands from flowers.
Signs Your Perennials Need Dividing
You’ll know it’s time when:
- The center of the plant becomes woody or bare
- The plant produces fewer flowers
- Growth appears weak or stunted
- The clump spreads wider than desired
- Plants start to compete for space
How to Prepare for Dividing Perennials
Before dividing, preparation ensures smooth root separation and minimal damage:
1. Water Thoroughly the Day Before
Moist soil makes digging easier and reduces root breakage.
2. Gather the Right Tools
Clean, sharp tools prevent infection and help you make neat cuts. Useful items include:
- Garden forks
- Spade or shovel
- Garden knife or hori-hori
- Gloves
- Buckets or trays for temporary root storage
3. Choose a Cool, Cloudy Day
Plants suffer less stress when divided in mild weather, away from harsh sunlight.
4. Prepare the New Planting Holes
Have the new spot ready before you start dividing to avoid drying out the roots.
Step-by-Step Guide: How to Divide Perennials Without Damaging Roots

Different plants have different root systems, but the overall process is similar. Below is a universal, beginner-friendly method you can adapt for most perennials.
Step 1: Dig Around the Plant Carefully
Start by digging a wide circle around the plant. Avoid getting too close to the crown or roots.
- Insert your shovel or garden fork into the soil at a slight angle.
- Work your way around the entire plant.
- Lift gently until the whole root ball pops out.
Using two forks back-to-back helps loosen compact root systems without tearing them.
Step 2: Lift the Plant Out with the Root Ball Intact
Once you’ve loosened the soil, lift the plant by the root mass—not the stems. Tugging the stems can cause unwanted breakage.
Place the plant gently on a tarp or smooth surface to keep the roots clean and contained.
Step 3: Examine the Root System
Before dividing, look closely at the roots to identify natural separation points:
- Healthy roots should be firm, white, or tan.
- Avoid division near dark, mushy, or rotting areas.
- Look for areas where the plant naturally forms clumps or crowns.
This helps you decide how many sections you can divide without stressing the plant.
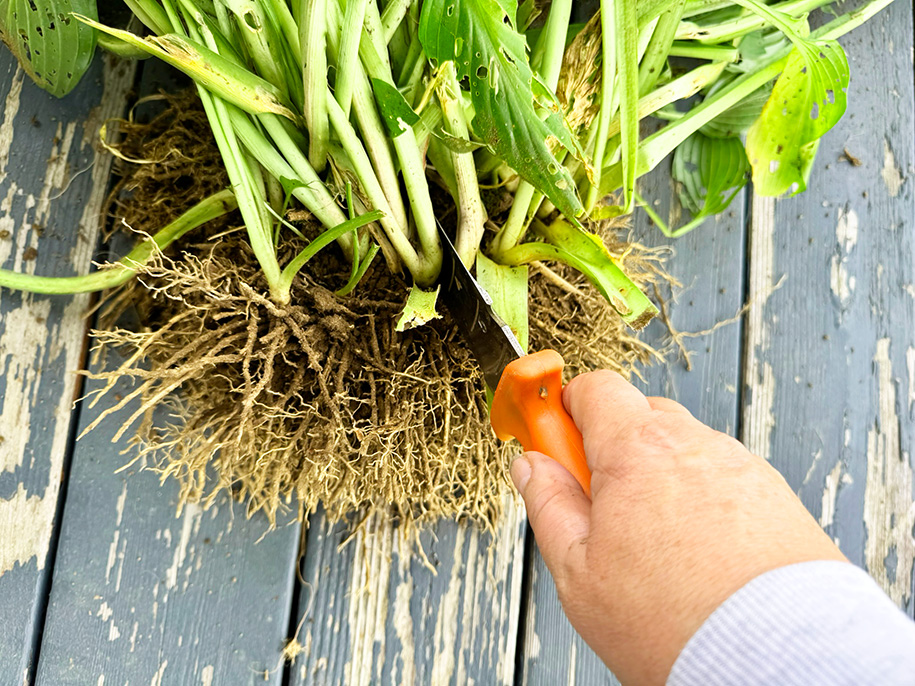
Step 4: Separate the Sections Using the Right Technique

Different root types require different dividing methods. Here are the main ones:
Fibrous Root Systems
Examples: Daylilies, hostas, coneflowers
- Use your hands, a garden fork, or a knife to pull apart clusters.
- These plants are the easiest to divide and tolerate gentle root separation.
Spreading Root Systems
Examples: Bee balm, black-eyed Susan
- These plants send out runners.
- Use a shovel or spade to slice sections cleanly.
Rhizomes
Examples: Iris
- Separate rhizomes by breaking or cutting them into healthy segments.
- Each piece needs at least one fan of leaves and a root section.
Woody or Tough Root Systems
Examples: Peonies, ornamental grasses
- Use a sharp knife or even a saw if necessary.
- Avoid crushing the root fibers.
Bulb Clumps
Examples: Daffodils, tulips
- Gently pull bulbs apart by hand.
- Only replant healthy, firm bulbs.
Tip: Each division should have:
- A good root system
- At least 2–3 healthy stems or shoots
- No signs of rot or disease
Step 5: Trim and Clean the Roots (Optional but Helpful)
Remove:
- Damaged roots
- Excess long roots
- Dead sections
This encourages the plant to grow fresh, strong roots after replanting.
Step 6: Replant the Divisions Immediately
To avoid drying out:
- Replant new divisions the same day.
- If needed, keep roots covered with damp burlap or in a bucket of water for short periods.
When planting:
- Dig a hole slightly larger than the root section.
- Set the plant at the same depth it was originally growing.
- Spread the roots naturally, don’t coil them.
- Backfill gently and tamp soil lightly.
Step 7: Water Thoroughly and Mulch
After planting:
- Water deeply to settle the soil and eliminate air pockets.
- Add a light layer of mulch (but not touching the stems).
- This keeps moisture consistent and protects tender roots.
Caring for Perennials After Dividing
To help your new plants establish without stress, follow these care guidelines:
1. Keep Soil Evenly Moist
Don’t let the soil dry out completely for the first few weeks. Moisture helps roots settle and expand.
2. Provide Shade if Needed
If the sun is strong, give temporary shade using cloth or cardboard to avoid transplant shock.
3. Avoid Fertilizing Too Soon
Fertilizer can burn tender roots. Wait 4–6 weeks before feeding.
4. Monitor for Stress Signs
Watch for:
- Wilting
- Leaf discoloration
- Slow growth
These issues typically resolve with proper watering and shade.
5. Maintain Mulch
Mulch retains moisture and prevents weeds from competing with your newly divided plants.
Common Mistakes to Avoid When Dividing Perennials
Even experienced gardeners can slip up. Here are mistakes to watch out for:
Dividing at the Wrong Time
Dividing in extreme heat or right before flowering can shock the plant.
Cutting Roots Too Aggressively
Roots are the lifeline of the plant—handle with care and use clean tools.
Letting Roots Dry Out
Roots can die quickly if exposed to air for too long.
Replanting Too Deep
Burying crowns below the soil level can lead to rot.
Ignoring Plant Health
Never divide sick or stressed plants—they won’t recover well.
Final Thoughts
Dividing perennials is a rewarding way to refresh your garden, encourage healthier growth, and create new plants all without spending a penny. The key to a successful and stress-free process is understanding timing, using the right tools, and handling roots gently.
By following the steps outlined above—digging carefully, separating roots thoughtfully, and providing proper aftercare—you can divide almost any perennial with confidence and without damaging the root system.
Whether you’re managing an overflowing garden bed or simply looking to expand your plant collection, dividing perennials is one of the most valuable skills a gardener can learn. With practice and patience, you’ll soon be multiplying your favorite plants and keeping your garden vibrant year after year.